Shrink Film Rings
Project Description: I have a thing for rings. So I’ve been having a lot of fun designing and creating my own rings this week, using Grafix Shrink Film and Sakura Glaze® Pens!
Designed by: Maureen Wilson
Difficulty: Moderately Challenging
Materials:
- Grafix Shrink Film
- Stamps
- Solvent or pigment ink pad
- Sakura Glaze® Pens
- Ruler
- Scissors
- Parchment paper
- Cookie sheet
- Oven or toaster oven
- Winter glove
- Cylinder (lipstick tube, marker, ratchet socket, etc.)
Steps to Make This:
Prepping Your Ring
- Before you get started, read all the instructions on the Grafix Shrink Film package so you have a good understanding of how the product works. The film is slippery to stamp on, so you’ll need to be careful. (The package mentioned you could sand some types of the film before stamping… in my experience, this just made the ink bleed. But it might be worth doing your own experiments!) Place the stamp straight down without wiggling it, and lift it straight up. Allow the ink to dry before coloring.
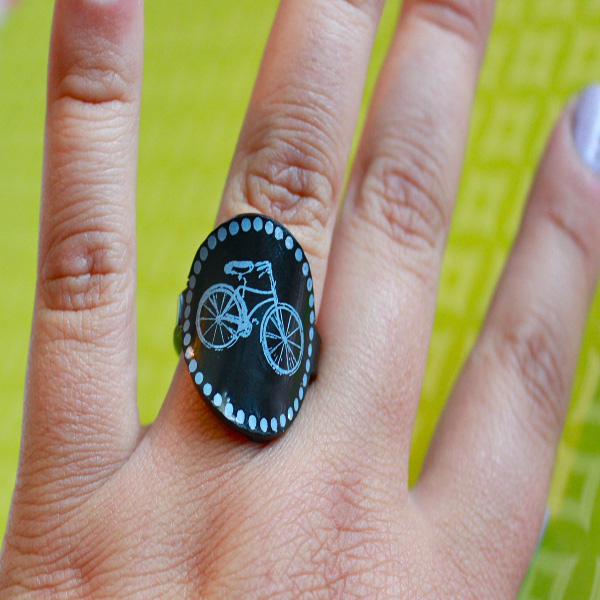
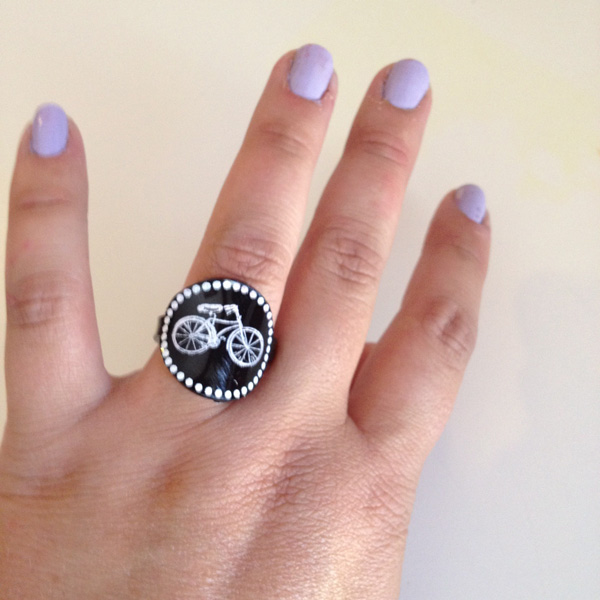
- I really love the way Sakura Glaze® Pens work on the Shrink Film! As the film shrinks, the Glaze® inks lose most of their shine, but the colors intensify and you’re left with a beautiful, bold image. Color your stamped image with the Glaze® Pens.
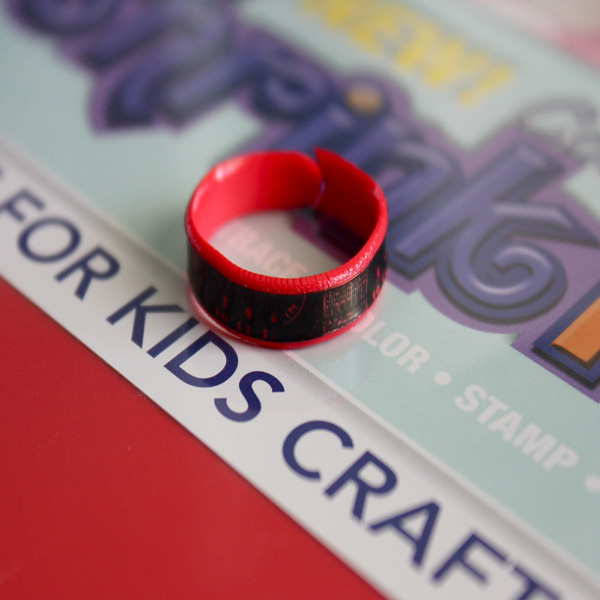
- Once all the ink is dry, you need to cut out your ring. Try to make the stamped image be in the center of the strip. The strip itself should be around a half-inch wide. The length will vary a bit depending on the size of your finger, but it will likely need to be between 5 and 6 inches. (My ring finger is US size 7, and cutting the film to 5.25 inches gave me a nice fit.)
- I recommend rounding off the corners of the band, as angles can be a little sharp once the ring is baked.
- Before you bake, you’ll need to find a cylinder that is about the circumference of your finger. This isn’t as hard as it sounds. A lipstick or a marker might work. My favorite things to use are the pieces from my ratchet toolset. I have a wide variety of sockets, each a millimeter larger than the last. (To see if your object is the right size, try sliding one of your rings over it.)
Baking Your Ring
- The Shrink Film package also recommends using parchment paper. (This is different from wax paper and freezer paper.) Lay this on a cookie sheet to protect it. Also lay a piece of parchment paper on top of the ring while it’s baking, to prevent the film from curling inward and sticking to itself. When making rings, I prefer to bake them face-down, because it makes it easier to shape them immediately.
- Preheat your oven to 350 degrees or the temperature indicated on the package. Make sure you have your cylinder ready.
- As your ring bakes, it will shrink to about a third of the size. If you peek at your ring and it’s curled up, it isn’t finished yet. It will flatten out again when it’s done. The package says it takes a couple of minutes, but in my experience, it took around five… just keep a close eye on it.
- I also highly recommend wearing a light winter glove. When the ring comes out of the oven, you have only seconds to shape it, and the film will be hot. The glove will allow you to shape the ring quickly and easily without burning your fingertips.
After Baking
- Once it’s done shrinking, take the pan out of the oven and immediately place your cylinder in the center of the ring. Use gloved fingers to wrap each side of the band around the cylinder. Hold in place for a few seconds while the film hardens and cools.
- Slide it off the cylinder and you have a one-of-a-kind ring!
Tips & Tricks
- You can round off the corners of the ring band to make them less sharp. For some rings, I rounded off one end of the ring band, and made a concave curve at the other end… the ends fit into each other, making the gap at the back of the ring, less noticeable. (However, make sure that you’ve figured out the right measurement for your finger before attempting a ring like this, as it won’t work if the ring band has been cut too short.)
- If you don’t have stamps, you can draw or trace your own design. Again, Sakura’s Glaze® Pens are great for this.
- You can clean up small smudges with a wet wipe if you work fast.
- If your ring turns out bent, don’t be disappointed! Prop it upright on the baking sheet and bake again. It will flatten out and you can reshape it.
- You’re also probably wondering how sturdy these are. You can drop them and they won’t shatter. They feel like thick plastic.
- I only tested a few types of ink: StazOn Solvent Ink, Ditto Pigment Ink, and Stampin’ Up’s Craft Pigment Ink, as well as Sakura’s Glaze® pens. All of these stood up to scrubbing, but Stampin’ Up’s white ink faded to a dove gray. The image is still clearly visible but the coloring has changed.
- While it’s fun for kids to make their own designs, children should not use an oven or handle the hot shrink film.