Grafix Lesson Plan: Lesson 5
Project Description: Try this monoprinting activity to create your own prints with Grafix products.

Designed by: Lisa Thorpe
Difficulty: Moderately Challenging
Materials:
- Grafix Monoprint Plates
- Grafix Stencil Film cut into shapes
- Grafix Inking Palette
- Printing ink or open acrylic paint (standard acrylic paint dries too fast). Suggestion: one dark color such as black or dark brown and one contrast color
- Ink roller
- Baren
- Rags or paper towels
- Stiff bristle brushes
- Pencil erasers, q-tips or paper stub used for charcoal drawing
- Smooth non-textured paper to print
- Printed paper or paper objects ie: tickets, stamps, photos
- Glue stick
- Tissue paper (to print ghost on)
- Matte medium or decoupage glue (for gluing tissue ghost)
Steps to Make This:
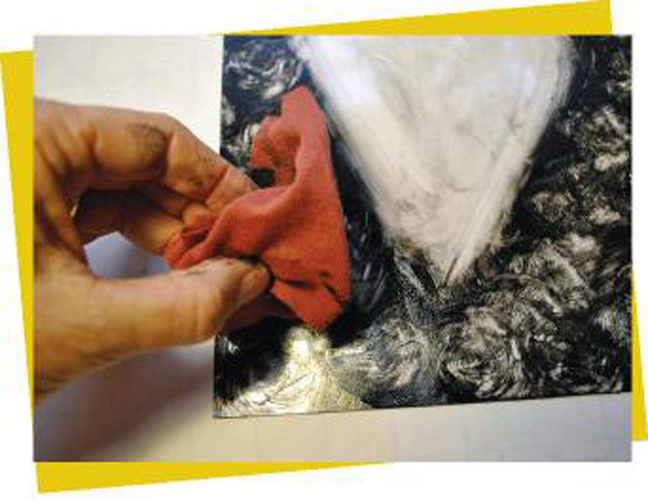
- Roll ink evenly on Grafix inking palette, then ink Grafix Monoprint plate so that an even opaque layer of ink is on the surface (I find that black or dark brown provides the most contrast with the white paper).
- Remove ink (subtractive method) by twisting, wiping, and rubbing a small rag or wadded paper towel on the inked surface.
- Use a pencil eraser, q-tip, or paper stub to subtract thin lines.
- You can remove more ink and add texture by pressing clean bubble wrap or rubber stamp onto the inked plate.
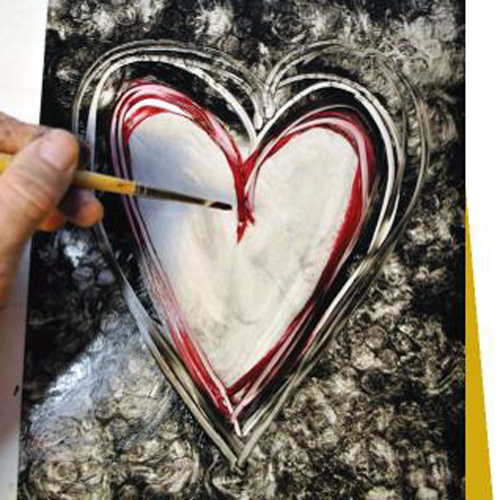
- Now add ink of contrasting color (additive process) by brushing on with a stiff bristle brush.
- Move the printing plate to a clean surface and place the paper face down on a plate. Using baren or flat block rub back of the paper – apply pressure, making sure the entire surface of the plate has been rubbed with extra focus on edges.
- Peel paperback and reveal the print. Set aside on a flat clean surface to dry.
Additional Monoprint Techniques
Ghost Print
Before cleaning or re-inking your plate, take a ghost from what ink is left. Lay a piece of tissue or other paper on the plate and gently rub this time with the palm of your hand to lift any remaining ink. Once both the original and ghost print have dried, use matte medium or decoupage to glue tissue ghost over original print or other interesting papers.
Masking Technique
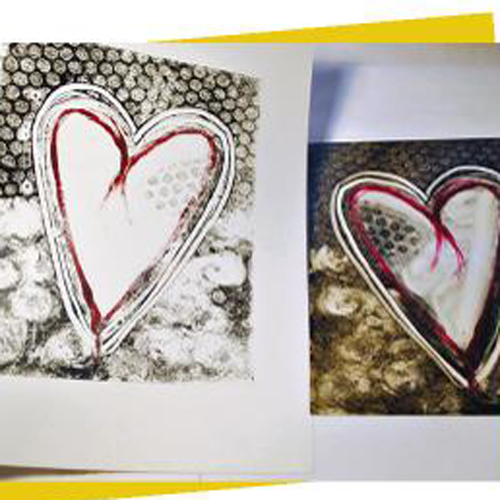
Create a mask using Grafix Stencil Film, cut to the desired shape (see heart). Ink the shape, lay shape on inked and textured printing plate prepared as in steps 1–3. Pull print. (Create a mask with any thin object, for example, inked leaves work nicely if they are very thin.)
Stamping Technique
Add more texture and pattern to the prepared plate (steps 1–3), by inking a rubber stamp with contrasting ink, rolling ink onto thin found objects such as netting from a bag of oranges, then lay on the plate and rub as before.
Overlay Technique
Don’t like a print? Or it came out too light? Ink up the plate again (steps 1–6), then this time carefully lay the print plate onto the first print to line up edges and rub vigorously.
Collage Technique or Chine Colle
For this technique paper collage elements are applied during the print process. Cut printed paper to desired shape (thin paper ephemera can also be used, ticket stubs, stamps, photos, etc.). Apply a generous amount of glue to the back of a paper shape. Then lay face down – glue side up – onto prepared printing plate (steps 1–6). Lay the paper down as before, rub with baren paying extra attention to the place where paper objects are, peel print as before.