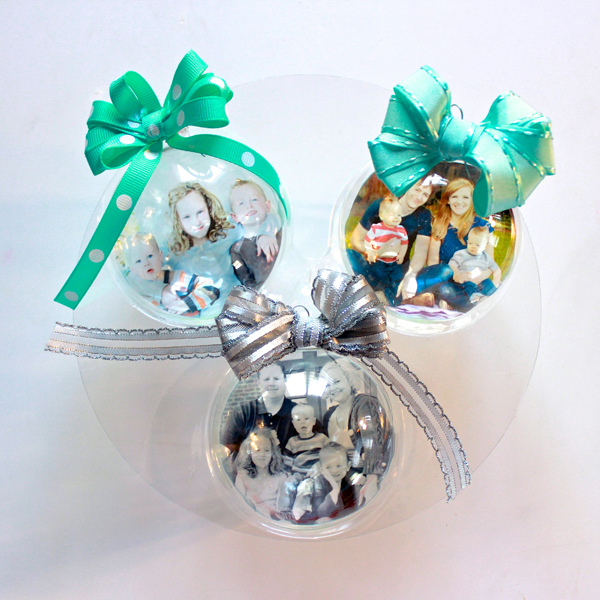
Photo Ornaments
Project Description: Photo ornaments are a quick but elegant way to decorate for the holidays. They also make inexpensive gifts!
Designed by: Maureen Wilson
Difficulty: Easy
Materials:
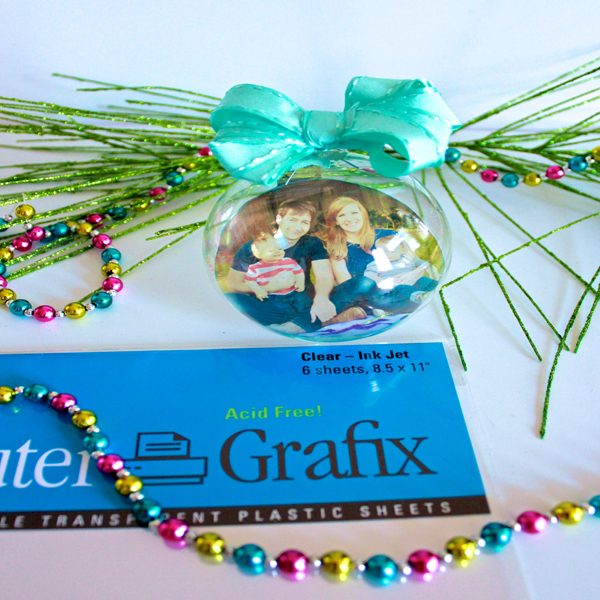
- Computer Grafix Clear Film for Ink Jet
- Printers
- Clear glass or plastic ornaments
- Computer & printer
- Scissors
- Ribbon
- Glue dots or glue gun (for ribbon)
Supply Tips: You’ll need a clear glass or plastic ornaments. Remember that glass ornaments are fragile, so opt for plastic ornaments if kids are crafting with you. Plain ornaments like these can be found at almost any store around the holidays. I bought six of these large ornaments for less than $4.
You’ll also need clear transparent film. My local craft store carries Computer Grafix transparent sheets by their photo paper. You might also check the office supply section of larger stores. It’s important that the film is specifically made for home printers. Computer Grafix film can be used in either a laser or inkjet printer. Best of all, this particular brand is archival safe, meaning that your printed photos will last for years.
Steps to Make This:
- We’ll start by preparing the photos for printing. Check the ornament’s packaging to see what size they are. The photos will need to be cut into circles slightly smaller than this. To get a perfectly sized circle, we’ll make a quick template in a word processing program. (I’m using Microsoft Word, but this can be done in other programs as well.)
- Open a blank page and click on the Insert tab.
- Click Shape, and then select a circle from the menu.
- Hold the Shift key while dragging on the corner of the shape. Notice the dimensions of the shape are shown in the corner. (In some programs, you may need to double click the shape and select Edit, then type in the desired size.)
- You can print out this page, cut out the circle, and trace it on your photos. Or, you can take it a step further and overlay the circle directly on your photos, which will save some time later. To do this,
- Right-click the shape and choose Arrange, then select Bring to Front.
- Right-click the shape again and choose Format Shape (or Edit Shape in some programs).
- Select Fill from the menu, click on Color, and choose No Fill.
- Now your shape is empty, so you can drag it directly over your photo. Use the arrow keys to nudge it into place.
- You can print a lot of photos on one transparency sheet, but leave about a half-inch above each circle to fit in the neck of the ornament.
- It’s a good idea to print a test sheet on regular paper first.
- Once your photos are set up, add the transparent film to the printer. Make sure you insert the film so that it will print on the rough side.
- Remove each sheet from the printer promptly and lay the ink-side up for a few minutes while the ink sets.
Creating the Ornament
- Now you can cut out the circles. Either trace your circle template or cut around the circle printed on your photo. Leave a 1/2 inch square at the top of the photo, as this will slide into the neck of the ornament and keep the photo in place.
- To place the photo in the ornament, remove the ornament’s cap by pulling upward. Roll the photo tightly, with the rough side of the film on the inside.
- Slide the circle into the ornament, using the rectangle at the top of the circle to position the photo.
These transparent ornaments look great with color, black, and white, or sepia photographs. However, you might want to avoid text since it will appear backward from the other side of the ornament.
Adding Ribbon Bows
If you’d like, you can accessorize your ornament with handmade bows. I’ll show you how to make an easy multi-loop ribbon bow.
- Cut about a yard of ribbon, as well as a second piece that’s about 8 inches long.
- Hold the cut end of the long ribbon against your fingers with your thumb. Wrap the ribbon around your four fingers. Make sure the ribbon is directly aligned on top of itself.
- Pinch the ribbon loops with your free hand and slide them off your fingers.
- Flatten the loops, then make a small snip on each side of the ribbon in the center. (Do not cut all the way through the ribbon.) This will allow us to achieve a tighter knot.
- Use the shorter segment of ribbon to tie a knot around the looped ribbon. Place the shorter ribbon in the center of the loop, along with the snips, and pull tightly while knotting.
- Tug on each loop to separate. You can either leave the ends of the ribbon long, or you can snip them off.
- Use glue dots or a hot glue gun to adhere to the top of the ornament.