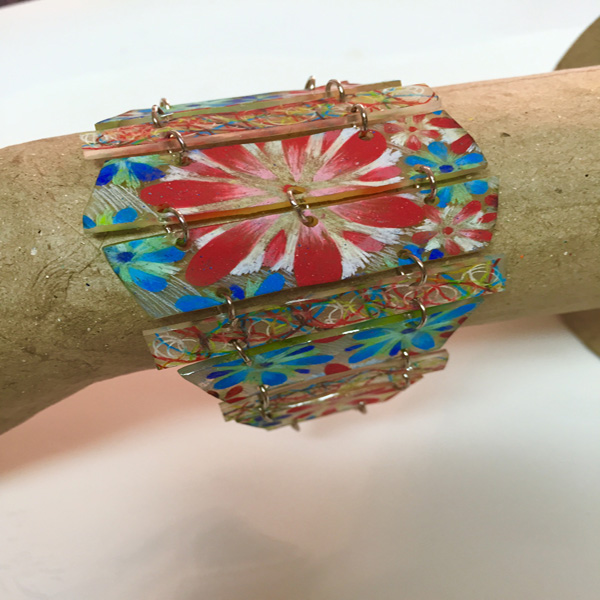
Flower-Full Shrink Film Bracelet
Project Description: Learn how to create customized jewelry with Grafix Shrink Film.
Designed by: Tami Sanders
Difficulty: Moderately Challenging
Materials:
- Grafix Super Sanded Shrink Film
- The Crafter’s Workshop: TCW552 Daisy Splash Stencil
- Prismacolor Pencils: Blush Pink, Poppy Red, Carmine Red, Canary Yellow, Light Cerulean Blue, True Blue, Indigo Blue, Chartreuse, White, and Colorless Blender
- Fine Point Permanent Marker
- 6mm Jump Rings
- Clasp
- Jewelry Tools
- Scissors
- Hole Punch
- Parchment
- Baking Sheet
- Blue or Masking Tape
Steps to Make This:
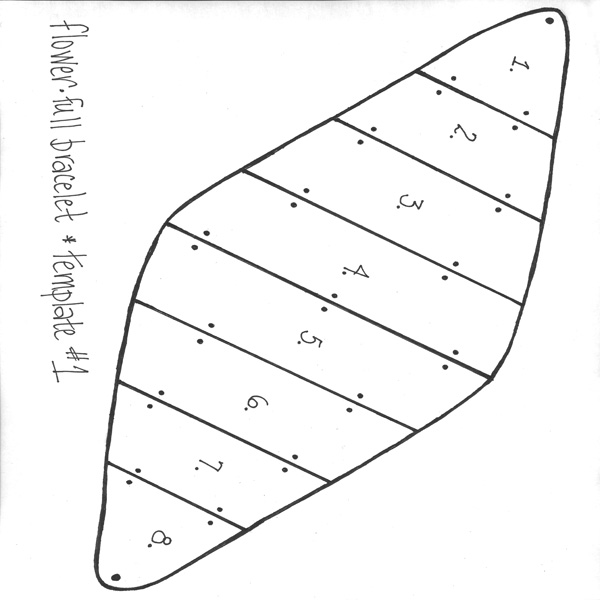
Template #1:
- Tape template #1 down to the work surface.
- Tape a sheet of Super Sanded Shrink Film down over the template.
- Lightly trace the template onto Shrink Film with a permanent marker.
- Use a stencil and colored pencils to add flower designs to bracelet pieces on the template, centering the largest flower at the center of pieces 4 and 5. Blush Pink, Poppy Red, Carmine Red, Canary Yellow were used for the red flowers, and Light Cerulean Blue, True Blue, Indigo Blue, Chartreuse for the blue. Start with lighter colors close to the center and use darker colors towards the outer edges of petals. Use a blender to soften and blend colors. Accents of white were added in between petals of larger flowers to brighten designs.
- Once you are happy with the coverage of flowers, scribble white diagonal lines in between flowers using a white pencil.
- Cut out pieces of the bracelet, trimming just inside or trimming off marker lines.
- Punch holes in each of the pieces.
- Line baking sheet with parchment paper and place bracelet pieces on it – with penciled side UP. Bake according to package directions. You may want to line them up in “number” order as noted on the template for easier assembly.
- Shrink pieces will be HOT! Allow cooling on the baking sheet for a few minutes before transferring to another surface to finish cooling.
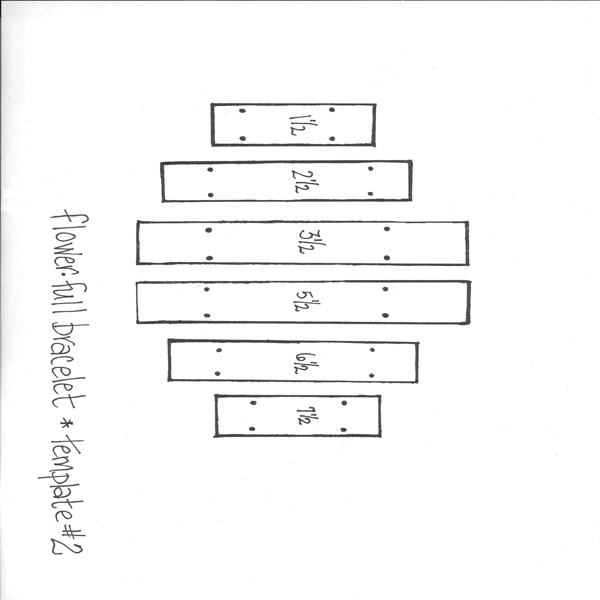
Template #2:
- Tape template #2 down to the work surface.
- Tape a sheet of Super Sanded Shrink Film down over the template.
- Lightly trace the template onto Shrink Film with permanent marker.
- Use colored pencils to add scribbles to cover all the pieces of the template.
- Cut out pieces of the bracelet, trimming just inside or trimming off marker lines.
- Punch holes in each of the pieces.
- Line baking sheet with parchment paper and place bracelet pieces on it – with penciled side UP. Bake according to package directions. You may want to line them up in “number” order as noted on the template for easier assembly.
Assembly:
- Line baked pieces up in order according to their number on the templates. Penciled side up is the right side.
- Use jump rings to attach all pieces together.
- Attach clasps to either end of bracelet using jump rings.