Grafix Artist Trading Cards
Project Description: Artist Trading Cards, or ATC’s, are tiny handmade works of art that can be swapped and collected. You can mix and match mediums, experiment with new techniques, and trade your work with artists across the globe.
The first thing you need to know is that the standard size for an ATC is 2.5 x 3.5 inches. The majority of online swaps require that the card be that exact size. You will need to have a sturdy material for your bases, such as chipboard or craft plastic. I’m using Grafix Chipboard because it’s acid-free, so my artwork will last for a long time.
Designed by: Maureen Wilson
Difficulty: Challenging
Materials:
- Grafix Natural and White Chipboard
- Grafix Matte Dura-Lar®
- Rub-Onz Transfer Film
- Book page
- Acrylic paint
- Sakura Gelly Roll Classic™ White
- Sakura Koi® Water Colors
- Heidi Swapp overlays
- Tim Holtz clock
- Brad
- Gelly Roll Stardust® Pen
- Sakura Pentouch® Paint Marker (silver)
- Butterfly rub-on
- Liquitex Modeling Paste
- Aqua glitter
- Rhinestones
- Mod Podge
- Paintbrush
- Arrow Punch
The first thing you need to know is that the standard size for an ATC is 2.5 x 3.5 inches. The majority of online swaps require that the card be that exact size. You will need to have a sturdy material for your bases, such as chipboard or craft plastic. I’m using Grafix Chipboard because it’s acid-free, so my artwork will last for a long time.
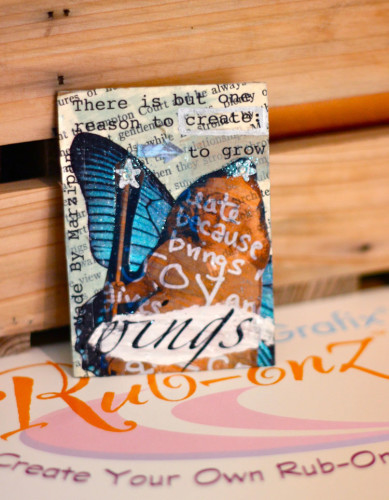
Steps to Make This: Card #1: Grow Wings
1. My ATC’s will be collaged. I recommend Mod Podge for collages because it can seal the paper’s front and back. Spread a thin layer of Mod Podge on the chipboard with a paintbrush. Smooth the paper on top. I’m using a page torn from an old book. Trim off the excess paper.
2. You can add color with acrylic paint. Mix in a bit of water to achieve the level of transparency you want, then brush it onto your card.
3. I like to use a lot of layers in my collages, and using different forms of media keeps it interesting. Dura-Lar matte film is a good choice because it can accept many types of media, such as paint, pencil, and markers. It’s semi-translucent so it will give my image a ghost-like effect. I’m brushing the Dura-Lar with copper-colored acrylic paint.
4. Once it’s dry, I can write directly on top of the paint with a Pentouch® silver pen. A touch of metallic gives the card shimmer and the illusion of dimension.
5. Rub-ons are great for collages, because they can overlap various layers, and can be applied to many surfaces. When making ATC’s, it’s really fun to make your own, personalized rub-ons. You can turn your name or even your own photo into a rub-on with Rub-Onz Transfer Film.
6. To use the film, change your printer settings to “photo paper.” If you are printing text, you must print it in reverse. Usually, this is found in your printer settings under “Mirror Image” or “Flip Horizontally.” You’ll need to print on the matte, non-shiny side of the film.
7. The package also includes sticky sheets with a white paper backing. Remove the backing from one sheet, and carefully smooth it on top of the matte film you just printed on. You are rubbing it directly onto the images you printed.
8. Smooth out any air bumps with your finger, and then use a stick to burnish the images. Rub them thoroughly to make the image adhere to the sticky film. Then cut out the image, trimming closely.
9. Peel off the clear film, and place it on your card surface. Rub once more to transfer, and then peel off the matte film.
10. Now that I’ve turned my photo into a rub-on, I’m going to alter it a bit by giving her a pair of butterfly wings. I already had these glittery rub ons in my stash.
11. Next, I can add my photo on top. Apply a thin layer of Mod-Podge to the Dura-Lar and adhere.
12. I feel like my card could use more texture, so I’m adding a dab of Liquitex modeling paste at the bottom. While that dries, I’ll embellish a little bit with the silver Pentouch®. It shows up very well on dark surfaces.
13. I added another Rub-Onz on top of the modeling paste once it dried. I put a touch of aqua glitter on every ATC I make. I’m coloring the edges of my card with the Pentouch® to give it some shine.
14. It’s a good idea to seal the card with a light coat of Mod Podge.
15. Finally, I’m adding a couple of tiny rhinestones for extra sparkle.
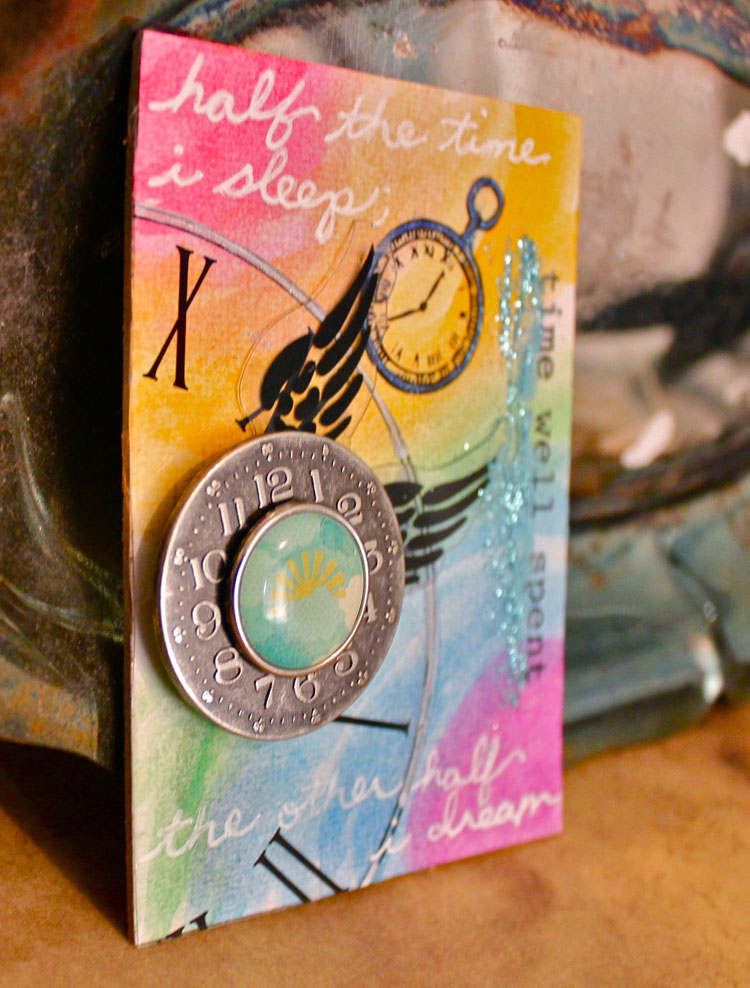
Steps to Make This: Card #2: I Dream
1. Every ATC you make should be different. This time I’m using Grafix white chipboard as my base because it will make my colors pop.
2. I’m using Sakura’s Gelly Roll ClassicTM White pen to write a quote on my card.
3. Next, I’ll paint the card using Koi® Water Colors. This kit comes with a handy water brush that’s perfect for blending. As I paint, the white writing shows through.
4. I’m adding some Rub-Onz I printed earlier. I’m also using a clock and wing overlay by Heidi Swapp because I had it on hand, but you can easily make your own using printable transparency film.
5. I’m adding some shimmer to the clock with the silver Pentouch®.
6. A brad in the center of this metal clock will reinforce the theme of my card. I’m applying the clock with thin pop dot squares so it has more dimensions.
7. This Rub-Onz clock could use a bit of sparkle as well, so I’m coloring it with a Gelly Roll Stardust® Pen. And of course, I have to use my signature sprinkle of aqua glitter.
So now that you know how to make an Artist Trading Card, what can you do with them? I recommend visiting the website atcsforall.com, a beginner-friendly site for swapping these miniature works of art.