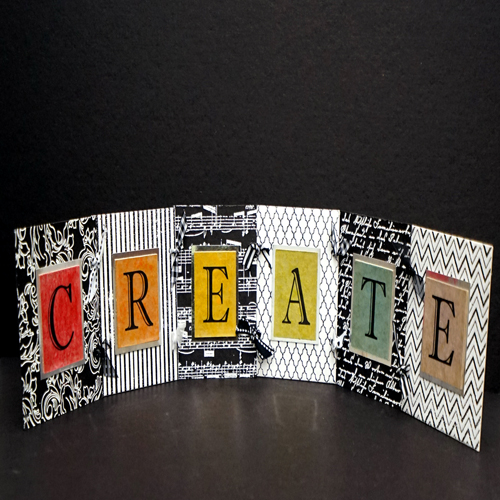
Grafix Chipboard Inspirational Décor
Project Description: Transform chipboard and printable film from Grafix into an inspirational accent piece. Personalize with names, phrases, words, and more!
Designed by: Tami Sanders
Difficulty: Easy
Materials:
- Grafix 4×4” White and Black Chipboard Squares
- Grafix 10×13” Silver Metallic Foil Board
- Grafix 8.5×11” Computer Grafix Clear Adhesive Backed Film Sheet
- Hero Arts: Music Background, Old Letter Writing, Zig Zag, Canvas Stripes and Lattice
- Background stamps
- Hampton Art: Flourish Background stamp
- Clearsnap: Smooch Spritz Pearlescent Accent Spray – Cherry Ice, Gingersnap, Splash, Sun Kissed, Limolicious, and Grape Burst
- Clearsnap: ColorBox Pigment Ink Pads – Frost White and Black
- Clearsnap: Top Boss Embossing Powder – Black and White
- Clearsnap: Color Catcher Spray Box
- Beacon Adhesives: Zip Dry Glue
- Assorted black-and-white ribbons
- Paper trimmer
- Scissors
- Hole punch
- Heat tool
- Ruler
- Pencil
Steps to Make This:
- Stamp (using Frost White) and emboss (using White) three Black chipboard squares as follows: first square Flourish Background, second square Music Background, third square Old Letter Writing.
- Stamp (using Black) and emboss (using Black) three White chipboard squares as follows: first square Canvas Stripes, second square Lattice Background, third square Zig Zag.
- Print “CREATE” in font of choice, sized to approximately 1-1/2” to 1-3/4” tall, and spaced so that letters can be cut out in 2” squares, on Computer Grafix sheet. Let the ink dry, and then cut out letters in 2” squares.
- Cut six 2”x2” squares from the remaining White chipboard squares. One at a time, place 2”x2” White chipboard squares in Color Catcher and spritz each with a different color of Smooch Spritz; set aside to dry.
- Adhere letters to “Smooched” chipboard squares. Cut six 2-1/4”x 2-1/4” squares from Metallic Foil Board; mat “Smooched” squares on Metallic Foil Board squares.
- Adhere matted letter squares to centers of 4”x4” chipboard squares to spell “CREATE”.
- Mark and punch two holes on both sides of 4”x4” chipboard squares for “R”, first “E”, “A”, and “T”. Punch only the right side of “C” and the left side of the second “E”.
- Cut ten 8” ribbon lengths. Thread ribbons through punched holes to tie letters together.

