Linocut Notebook
Project Description: A linocut is a hand-carved design that is then inked like a stamp and pressed to another surface to create an original print. These are a lot of fun to make, and you can re-use your linocut many times!

Designed by: Maureen Wilson
Difficulty: Moderately Challenging
Materials:
- Grafix Impress Inking Palette
- Grafix Chipboard or Card stock
- Linoleum carving block
- Lino carving set
- X-Acto knife
- Cutting mat
- Brayer
- Block printing ink
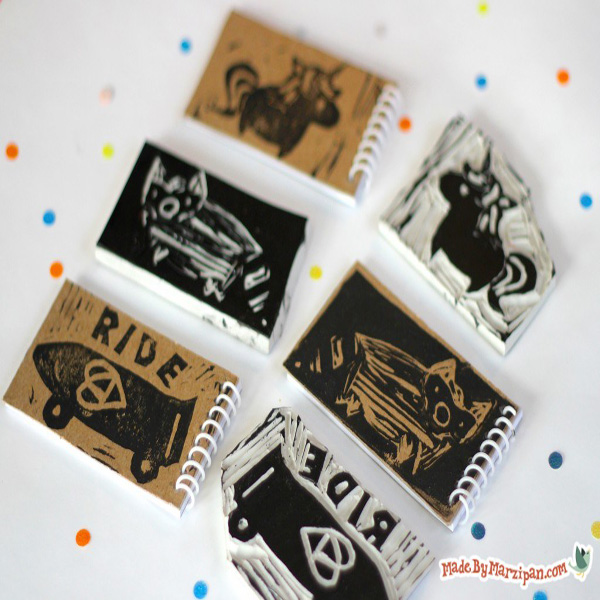
- Mini notebook
- Single hole punch 1/8 in.
NOTE: It’s important to have a smooth plate or palette to apply the ink to. I love to use the new Impress Inking Palette film, made by Grafix. This is a pad of clear film with adhesive on the ends, so the film won’t shift while rolling. It really minimizes the messiness of printmaking.
Steps to Make This:
Designing
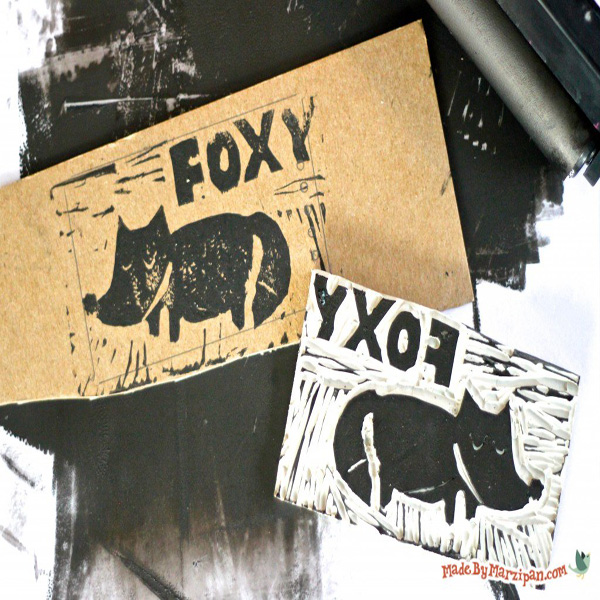
- It’s best to sketch your design out on paper first. The trick is to remember that all of your lines will be printed in reverse, so you’ll need to think opposite. Any areas you don’t carve are called positive space, and those will show up in ink. Any lines you do carve are called negative space, and those will remain un-inked. You may find it helpful to label the areas of your drawing as white/cut, and black/leave. Keep the lines simple, and remember that it’s challenging to create fine lines.
- Start by using the craft knife to trim your lino block to the finished size. The most important rule in carving a block is to always cut away from yourself, while being continuously aware of where your opposite hand is.
- Now draw the image directly onto your block using a pencil.
Carving
- You can begin carving your block now. I’m cutting just inside my penciled line. When using a lino cut tool, you want to skim just beneath the surface of the block, rather than gouge out large chunks. Try to keep your motion fluid and your line smooth.
- Turn the block so that your fingers are always out of the way of the blade. (The first time I did this, I cut myself almost immediately, not realizing that the curved edge is razor-sharp. So use extreme caution at all times!)
- I’m changing out my blade for a larger one so I can cover more area. Start with shallow cuts; you can always remove more later. While it’s possible for you to cleanly remove all the negative space, it’s more customary to leave a bit of texture so that some of your carve lines show up in your final print, making it easily recognizable as a hand-carved block print.
- To cut out small circles, as for these eyes, slide the blade just below the surface of the block, making a half-circle cut. Turn the block upside down and cut from the opposite direction, removing the circle.
- One more important thing to remember: all of your text will need to be written backwards, as a stamp is a reverse image. On this stamp, I’m writing “HI,” which looks the same forwards or backwards. But if I were writing something like “CUTE,” I’d need to remember to reverse the letters.
Printmaking
- Now we can start making prints! Add a dab of paint directly to the Inking Palette film. Use your brayer to evenly smooth out the ink.
- Some people prefer to load the brayer with ink, and then roll the linocut directly. When I’m working with a small block like this, I find it’s less messy to press the block directly into the ink. Press firmly, and then check to make sure the entire positive surface of the block is wet with ink. If not, press again.
- I’m first stamping on a piece of scratch paper to make sure I’m happy with my design. Alternately, you can lay the block face up and press the paper on top.
Making the Notebooks
- Now I’m ready to make these notebook covers. I’m using Grafix Chipboard, which is kind of like a stiff and durable cardboard. It comes in several sizes, but pretty much any size is fine since I’ll be cutting it down.
- Load the Inking Palette again, and then ink the block. Press directly to the chipboard and allow the ink to dry.
- Remove the coil from the notebook by twisting. Lay it on top of your print and trace, being sure to trace every punched hole as well.
- Cut out, then punch the holes using a small single hole punch.
- Add the cover to the stack of notebook papers, and tap the punched edge against the table to align. Replace the coil by twisting through the holes.